
A catalog is used to share different products at different prices to different customers.
It is preferable to create your products before creating your catalog.
You access the "Catalogs" section here:

Create and manage a catalog (Header)
You can copy an existing catalog or start from scratch:
Copy a catalog: Click on a catalog you want to copy to access to it and use this button: 
To create a catalog from scratch follow these steps:
- Click on the "Add" button
- Fill in the required information in the "1- Header" section

- Click on the "Save and Next" button
To modify catalog information follow these steps:
- Click on the catalog
- Click on the "Header" section
- Change the information
- Click on the "Save and Next" button
Here is the definition of all the fields:
| Fields | Descriptions |
| Your Catalog ID * | A code or a word to identify your catalog. It has to be unique. |
| Version | The version of your catalog. |
| Availability status |
|
| Start date * | Start date of your catalog availability. Your catalog will be unavailable if today's date is before that date. |
| End date * | End date of your catalog availability. Your catalog will be unavailable if today's date is after that date. |
| Name * | The name of your catalog. Input the name in as many languages as you want for your customers to see the information in their preferred language. |
| Description | The description of your catalog. Input the description in as many languages as you want for your customers to see the information in their preferred language. |
| Minimum amount per order | The customers will not be able to buy less than that amount in an order. |
| Maximum amount per order | The customers will not be able to buy more than that amount in an order. |
| Minimum quantity per order | The customers will not be able to buy less than that quantity in an order. |
| Maximum quantity per order | The customers will not be able to buy more than that quantity in an order. |
| Name (Distributor/Wholesaler) | The name of the Distributor/Wholesaler. |
| Email (Distributor/Wholesaler) | The email of the Distributor/Wholesaler. It will be used to send a copy of the purchase order. |
 Check the "Enabled" field to make your catalog available for the customers.
 Remove the check mark to make your catalog unavailable.
* = mandatory field
Add and manage products inside a catalog (Product & Prices)
In the "1- Products & Prices" section of the catalog
To add a product to a catalog
- In the section "Add products to your catalog", type in the name, UPC code or vendor code of a product.
- Click on it to select it
- Input the catalog price. The catalog price overwrites the standard price. If you don't input a catalog price, the standard price will be used.
- Optional: If the company is configured with the inventory management at the catalogue level, you may enter an inventory quantity for that product.
- Click the "Add this product to your catalog" button

This is what you can do to a product in your catalog:
- Search a product: type in the name, UPC code or vendor code of a product and click on

- Share this product sequence with your customers: Turn this on to share the sequence that you created for that catalog to the customer that will access this catalog. This could be a good marketing tool or to improve the user experience ordering your products.
 Disable this option and your customers will initially view the products in your catalog in an alphabetical sequence.
- Use custom sequence (the "Share this product sequence with your customers" needs to be activated): Activate this option to modify the sequence of the products in your catalog.
- Change the sequence of a product (the "Use custom sequence" needs to be activated): by using the arrow button

 . You can also use the "..." button
  to specify the position of a product in the sequence. This sequence is linked to the "Share this product sequence with your customers" field of the catalog.
 - Allocate and modify an inventory (The inventory management has to be at the catalogue level): Input the quantity available for selling and click on
 . Each time there is an order with that product, the quantity will be decreased.
 - Change the price: input the modified price and click on the check mark button
- Create and modify a promotion: The promotion will create visibility on this product amongst your other products by highlighting the product. There a 2 types of promotions:
- Discount: click on the
 button, select the promotion type, type the value and save.
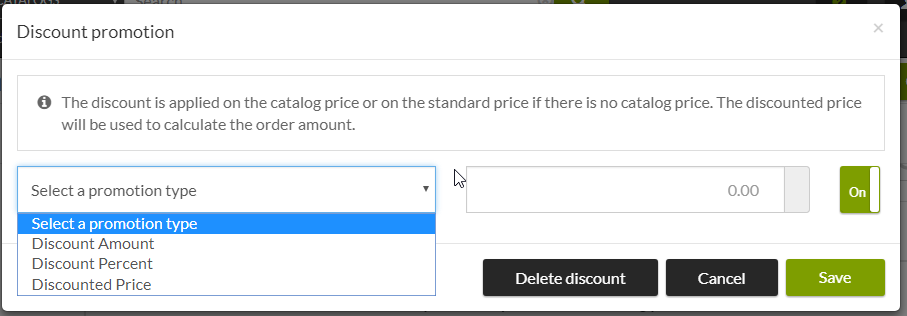
The discounted price will show on the product line:
This discounted price will then be used to calculate the order amount.
There are 3 discount types:- Discount amount $: the product price will be reduced by this amount
- Discount percent %: the product price will be reduced by this %
- Discounted price: the price of the product will become this price. The standard price and the catalog price will be disregarded.
- Rebate: click on the button, select the promotion type, type the value and save.
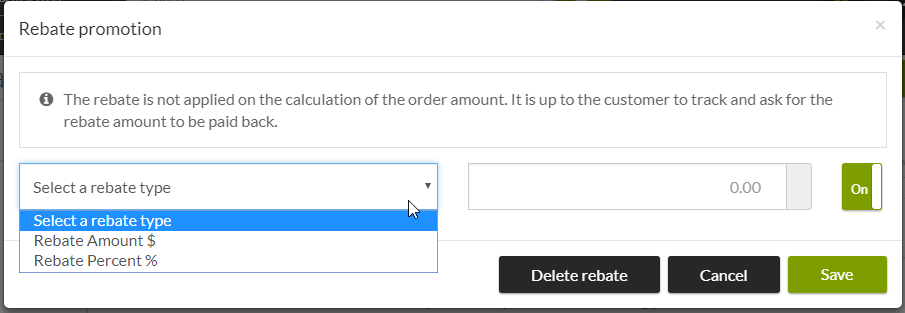
The rebate will show on the product line:
This rebate will NOT be used to calculate the order amount. It is your responsibility to track and contact the company that offer the rebate to get your money back.
There are 2 discount types:- Rebate amount $: the amount will be used as the rebate
- Rebate percent %: the rebated will be calculated based on a % of the product price (Catalog price if existing, if not, the standard price)
- Discount: click on the
- Enable/disable a product in the catalog: click on the button to switch it from enabled
 to disabled
  .
. - Delete a product from your catalog: click on
 to delete your product from your catalog. It not be possible to perform that action if the product is already associated with an order. Your product is still available for other catalogs.
Share the catalog (Catalog Sharing)
There are 4 ways to share a catalog to your customers:
In the "3- Catalog Sharing" section of the catalog
- Region: You can share your catalog with all the customers in a specific region. A region can be a country, province, postal code or a city.
- Click on the "Region" tab
 .
. - Type in a region and click on it.
- Click on the "Save" button
 .
. - You can remove a region by clicking on the "x" button
 and press the "Save" button
  .
.
- Click on the "Region" tab
- Authorized customers: you can share your catalog with a list of customers. These customers must have been created beforehand. See section "Customer".
- Click on the "Authorized customers" tab
- In the "Add Authorized Customers" section
- Search for a customer, sort by or filter by label to narrow down the list of customer that you want to share your catalog with.
- Select the customers in the list by clicking on the checkbox
 .
. - Click on the "Authorize and invite" button
 .
. - Confirm by clicking on the "Authorize and invite" button
 . Instantly your catalog will be shared to that list of customers and an email will be sent to them in order to invite them to shop in your catalog.
- In the "Manage the authorized customers in this catalog" section you can:
- Search, sort by and filter by status
- Enable/disable a customer: it will or will not be able to see your catalog. To do so, use the "On" and "Off" button .
- Send an invitation reminder: click on
 . It is possible to send the invitation email to the same email or a different one. It is also possible to copy/paste the link to the registration page.
 - Delete a customer from the catalog: click on to delete a customer from your catalog. This customer will not see your catalog anymore, but it will be a customer.
- You can also select multiple customers and do all those previous actions in bulk.
- Click on the "Authorized customers" tab
- Community: You can share your catalog to customers that are part of a community that you also belong as a vendor.
- Click on the "Community" tab
- Select a community that you want to share your catalog with.
- There are 2 differents ways to share a catalog within a community:

- Authorized customers: you can share your catalog with a list of customers that belong to the community. You can create these customer to configure a customer # and a delivery schedule (make sure to use the same email). Those customers will be identified with this sign:
 . See section "Customer".
- Select "Authorized customers"
- In the "Add Authorized Customers" section
- Search for a customer, sort by or filter by label to narrow down the list of customer that you want to share your catalog with.
- Select the customers in the list by clicking on the checkbox .
- Click on the "Authorize and Inform" button
 .
. - Confirm by clicking on the "Authorize and invite" button
 . Instantly your catalog will be shared to that list of customers and an email will be sent to them in order to inform them that they can now shop in your catalog.
- In the "Manage" section you can:
- Search, sort by and filter by status
- Enable/disable a customer: it will or will not be able to see your catalog. To do so, use the "On" and "Off" button .
- Send an invitation reminder: click on . It is possible to send the invitation email to the same email or a different one. It is also possible to copy/paste the link to the registration page.
- Delete a customer from the catalog: click on to delete a customer from your catalog. This customer will not see your catalog anymore, but it will be a customer.
- Get more information on the customer:

- You can also select multiple customers and do all those previous actions in bulk.
- Region: You can share your catalog with all the customers that belong to a community in a specific region. A region can be a country, province, postal code or a city.
- In the "Targeted zones".
- Type in a region and click on it.
- Click on the "Save" button
 .
. - You can remove a region by clicking on the "x" button
 and press the "Save" button .
- Authorized customers: you can share your catalog with a list of customers that belong to the community. You can create these customer to configure a customer # and a delivery schedule (make sure to use the same email). Those customers will be identified with this sign:
- Click on the "Community" tab
Comments
0 comments
Please sign in to leave a comment.